DIY How To: Distress Furniture, part 1
My first post!! This week I'm going to explain how to distress a dresser. I am going to break these DIY projects into multiple posts so they're not overwelming. Each post will be a step in the process.
To clean up use tack cloth (you'll know why they call it this when you use it...). It is available at home depot or any home improvement store. Just run a section of one of these clothes along the whole piece of furniture and it will clean up all the remnants from sanding!
Next I will discuss how to paint and finish your furniture! Stay tuned...
Let me know what you think. How I can improve? What else you want to see me try? :) All comments are welcome.
Distressing is really not a difficult process, but it is time consuming. You could complete the project in full in a long weekend, but realistically it will probably take about 2 weeks. I'm breaking it up into 2 blog posts.
There are many different distressing techniques as well. For my first project I chose to loosely follow Martha Stewart's Distressing Technique that she used on a chair. I plan to try some different ones going forward and of course re-do this same technique on different peices of furniture!
STEP 1: Choose your peice
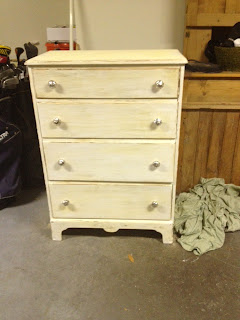
This is the fun part! Go shopping! I went to an estate sale to find my dresser (seen above). I paid $40, which was a little expensive, especially for my first project! You can find cheap furniture at garage sales, estate sales, craigslist, good will, thirft shops, etc.
You want to make sure you're using something that's real wood. Personally I wanted something that had a darker tint, I liked seeing the dark through the light exterior hue, but we'll see later how this is even fixable. The style is really up to you! The cheaper the better. Don't pay much attention to the changeable things (knobs, color), pay more attention to the lines and construction of the peice.
STEP 2: Sanding
Put down a drop cloth before you start anything! It will make cleanup a lot easier. Make sure you always sand outside or in a well ventilated area.
Before painting any furniture you want to sand off the top layer of paint/clear coat/stain. My particular dresser had a clear coating that was really difficult to sand off. Luckiliy I borrowed a sander from a friend at work. Make sure you wear a mask when sanding, the particles released in the air could be dangerous to inhale.
Even though I used a sander, you don't have to. Sanding by hand is fine as well, but it will take more man power. With sand paper, the smaller the number the more rough the sand paper. I used 80-grit (see above) which is fairly coarse. The more coarse the easier to sand, but you dont want to damage the peice. In hindsight, 80-grit was probably a little harsh. I would probably recommend 100-grit.
Take out all the drawers and sand down the peice. I did a lot of sanding to make sure all the clear coat was off, but lots of the stain was lost with the clear coat. Looking back I would have left more of the stain so it would show through more later on.
Make sure you take out the drawers to get the best angle on the furniture.
To clean up use tack cloth (you'll know why they call it this when you use it...). It is available at home depot or any home improvement store. Just run a section of one of these clothes along the whole piece of furniture and it will clean up all the remnants from sanding!
Next I will discuss how to paint and finish your furniture! Stay tuned...
Let me know what you think. How I can improve? What else you want to see me try? :) All comments are welcome.


Comments
Post a Comment