DIY How To: Distress Furniture, part 2
...Continued from 'DIY How To: Distress Furniture, part 1'
STEP 3: Primer
STEP 3: Primer
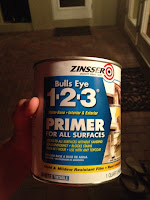
Primer is debateable. I learned after I purchased the primer I used (see to the right) that when you're using 2 coats of semi-gloss paint for the color you really dont need a primer.
One tip I got from a co-worker is you want to spend money on a good brush! If you buy a good brush such as the one to the left, you can re-use and re-use, you can basically use it for life!! I plan on doing a lot of these projects so I invested in this $11 brush.
Make sure the primer is well coated on the furniture and brush in the direction of the wood grain. This is the base coat. If you're lucky enough to have a spray paint gun, use that for a solid coating. Mine could have been a better paint coat, see finished paint job below. Let it dry for 24 hrs.
STEP 4: Paint Coat 1 + 2
After 24 hours, apply the base coat. I used the Martha Steward color Cornbread (yellow color above). I used Semi-mate (but I would recommend semi-gloss for furniture, did not know this when I started this project). The base coat can be applied lightly because in this case we used a primer. It does not have to have maximum coverage, again paint in the direction of the grain. See finished product below...
I had to admit after the base coat I was a little thrown off (it was so yellow!!?!), but this is how it is supposed to look. The last step is to add the top coat, I used Martha Stewart color Heavy Cream (off white color above). You can use any color for this top coat, but it should be in the same family of colors as the bottom coat (ex. turquoise, antique green, etc.). I wanted to use white for my first project because it's more forgiving!
This layer can be applied to your discretion, but in the direction of the grain. I wanted my furniture to definitely be white when you looked at it, so I applied the top layer more heavily and relied more on sanding to expose the bottom colors. Again though this is up to you. See how mine looked after the top coat.
This layer can be applied to your discretion, but in the direction of the grain. I wanted my furniture to definitely be white when you looked at it, so I applied the top layer more heavily and relied more on sanding to expose the bottom colors. Again though this is up to you. See how mine looked after the top coat.
STEP 5: final sand
This is the part where your peice really comes together! Sand at your discretion. If you want the piece to be more distressed looking and more worn, sand more and with lower grit paper. I did this and reused my 80 grit paper. It scratched off at some places, so this may have been a little too low for this part of the project. Concenrate sanding along the edges and corners.
STEP 6: Knobs
Pick out what knobs you want. Knobs are the hardware that will characterize your furniture. What look are you going for?
You can buy knobs at home depot, online, and my personal favorite Anthropologie. The knobs at anthropologie are really unique! I chose some antique mirrored ones in a circular shape. It is super easy to take off knobs and add different ones. This alone can change an entire peice of furniture.
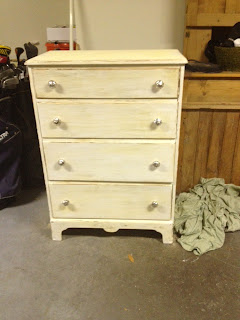
I am currently selling my dresser on ebay and craigslist. We'll see the result! If I don't sell it I'm going to keep it for my room... that's the perk of making things you love!
Sand, paint, and add knobs! It's that easy to go from simply shabby, to shabby chic! What do you think of the before and after? Are there any different distressed furniture techniques you want to try?
Give me your feedback and let me know.


Hey, Hilary! I recently bought a house and have taken a lot of interest in remodeling/refinishing. Enjoyed reading your blog posts! Just wanted to suggest you check out Annie Sloan's Chalk Paint. I am going to use it to paint my floors and it is great for the types of things you are doing.
ReplyDeleteHope you are well!
Kurt
Thanks for your feedback Kurt! I'll definitely keep that in mind! :)
Delete