Posts

Downsizing to a Duplex - Budget Bathroom Renovation

Image
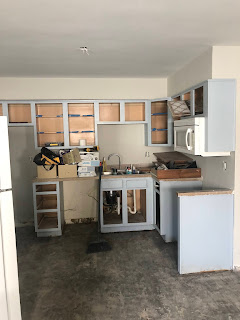
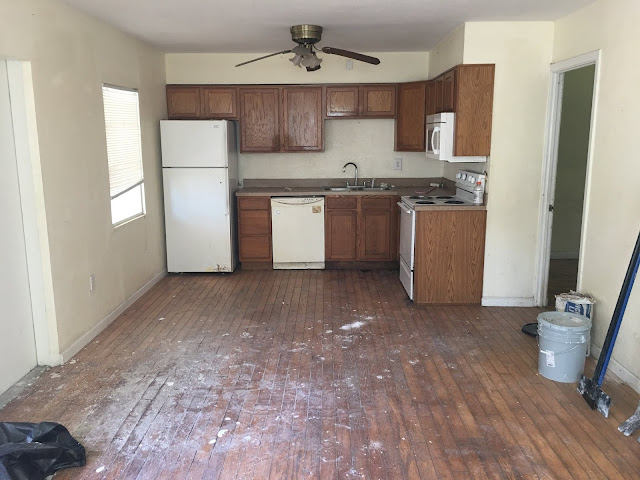
My fiance recently bought a duplex, 750 sf on each side. Over the past few months we've been renovating it from top to bottom. Today I'm going to focus on the bathroom renovation. The bathroom in this place is TINY, barely enough room for a tub, small vanity (24"), and toilet. So to make myself feel better about the small space, I went for it with the design! No! These are not my new bathroom! I drew inspiration from my favorite color combination (Navy, Grey, Gold), found bathrooms that did this color combination (see inspiration above), and applied it to my space in a $$ saving way! See below for purchases, budget, and progress/after photos! Vanity: $250 ( Lowe's ) This Allen + Roth vanity was right on budget but with great style that fit the color scheme! An added bonus was it came with the solid surface top and integral sink all in one! Durable surface for a future rental property... sign me up! Faucet: $95 ( Lowe's ) I wanted to us

Renovating on a Budget: How I Renovated a Bathroom for Less than 1,200 dollars

Image
You may say, 'No Way!?', but yes. I remodeled a full bathroom for less than $1200. I was about to list my house and the bathroom was in MAJOR need of a renovation, see below for before and after pictures. AFTER BEFORE Inexpensive, but Beautiful Materials $0.99/SF Floor tile...  I did a printed tile for the floor that is super trendy, but NOT expensive! I got one similar to below for  $.99/sf from  Home Depot  . For a 30 sf bathroom that's only $32 with tax! Add in thin set and grout for another $30 and you have a new floor! $270 Pre-manufactured Vanity from Big Box Store... Nobody beats this price! I've priced it out so many times thinking I could beat the "all-in-one" price. Once you add finishing the cabinet, countertop, and sink, there's no comparison! If you can change out the hardware to make it feel more personal and less big-box store, that helps too. Or you may get lucky and find one that already has that feel, for $27

DIY How To: Paint Kitchen Cabinets, Pt. 2 Painting

Image
Now the fun part.. painting! Pick the color of your choice in the PPG Breakthrough or similar brand and use a really good brush. Something I learned early on being in the construction industry is don't skimp on supplies . A really good brush will help even a bad painter and you can re-use it over and over. See last  post  for materials list before painting. STEP 1: PAINT CABINET BASE/UPPER FRAMES... If you use a mini roller for this it makes it much easier. Use a brush for anything the roller can't reach. Make sure to clean up any drips that happen, easier when the paint is wet! STEP 2: PAINT THE CABINET DOOR BACKS Flip all the cabinets so the back of the cabinet door is facing up. Load the brush up and get rid of the excess paint. You should still have a lot of paint on your brush and swipe it on in a uniform fashion to spread on the cabinet. When your brush starts to stick or pull off paint you don't have enough paint on your brush. It should be easy to move you

DIY How To: Paint Your Kitchen Cabinets Pt. 1 Prep

Image
Took the week off for July 4th! Back at it this week with a fun new project. My fiance recently bought a duplex. The plan is to move into the duplex when my house sells and rent out the other side (more on this under  House Hack  ). We are in the process of completely renovating the place. Part of that is the kitchen! The kitchen cabinets are one of the few things in the house that is in pretty good shape so instead of replacing them for thousands of dollars, we decided to paint over the existing cabinets for hundreds... Full disclosure: this is my first time trying to paint kitchen cabinets! We reached out to a friend of ours that does this for a living and she recommended the following products/procedures: 1. 220 Grit Sandpaper - our cabinets were pretty dingy, they needed a lower grit to clean off the dirt/drywall/etc. 2. Denatured Alcohol - any brand will do! 3. PPG Breakthrough Paint (in the color of your choice) 4. Sponge, paint brush, misc accessories to appl

My New House - Home in Winter Park, FL

Image
December 2017 I closed on my current home in Winter Park, FL. Like my  Altamonte Springs Condo  I bought this house in a great location next to must more expensive real-estate. The area I live in Winter Park is 4 houses and a residential street away from million dollar homes. The house is  a 4/2, 1,737 sf, mid-century modern style. It appeals to many different parties including young families since the schools are some of the best in the area. I bought the house for $285,000 with $5,000 in closing concessions.  As you can see the interior has much to be desired. But what I liked was the opening of the kitchen didn't  seem   to be a large structural renovation (it's just beyond that small bump out in the picture above), there were high ceilings in the living/dining room that would eventually be the main entertaining place in the house, most of the house had original hardwood, and all the renovations I was planning would be under roof.  My renova

Real Estate Investing 101: 3 Strategies and their Pros and Cons

Image
I've always enjoyed my long term flips. They've allowed me to hone my design skills and express my creativity through construction (you've see the product of those as blog posts). Something that has constantly bothered me about flipping is that on my tiny scale, there doesn't seem to be any long term wealth building as you just cash out of one and put into another. A website and podcast called  Bigger Pockets  ** opened my eyes to the world of rental properties and house hacking. This post is dedicated to 3 types of real estate investing that you'll see me talk about from time to time on the blog, what I like about them and what I don't.  1. Flipping As mentioned above this was my introduction to real estate investing. I've never done a quick flip, but I've now completed 2 long term live-in flips. It's super addicting if you like home construction and design because nothing is ever permanent (also good for the commitment phobe!). I've lo

Utilizing 3D Modeling to Optimize My Small Condo Kitchen Renovation

Image
The next major renovation I tackled on the condo was a kitchen renovation. I had a general idea of what I wanted to do, and I think it's the number one asked for renovation: open kitchen concept. Everyone loves the idea of entertaining and cooking all at once and not being kept away by a wall or hallway. Above is an isometric view in BIM of the kitchen before the renovation (I hid some walls for ease of viewing). The layout was very awkward, for instance, you couldn't be doing the dishes without constantly having to open and close the dishwasher. Not to mention being closed off from the rest of the house with the exception of a small pass through. See below for plan view. The entrance was also very cramped with only a single cased opening with the small original refrigerator in the entrance as you walked in. Again, no easy flow. See below for before picture of the kitchen (this picture was basically taken at the Elevation B viewpoint). Part of the reason I bought