DIY How To: Paint Kitchen Cabinets, Pt. 2 Painting
Now the fun part.. painting! Pick the color of your choice in the PPG Breakthrough or similar brand and use a really good brush. Something I learned early on being in the construction industry is don't skimp on supplies. A really good brush will help even a bad painter and you can re-use it over and over.
See last post for materials list before painting.
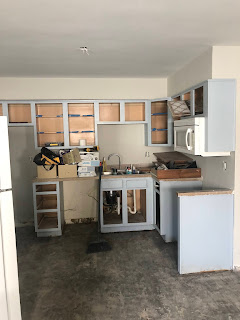
STEP 1: PAINT CABINET BASE/UPPER FRAMES...
If you use a mini roller for this it makes it much easier. Use a brush for anything the roller can't reach. Make sure to clean up any drips that happen, easier when the paint is wet!
STEP 2: PAINT THE CABINET DOOR BACKS
Flip all the cabinets so the back of the cabinet door is facing up. Load the brush up and get rid of the excess paint. You should still have a lot of paint on your brush and swipe it on in a uniform fashion to spread on the cabinet. When your brush starts to stick or pull off paint you don't have enough paint on your brush. It should be easy to move your brush over the cabinet, if it's not get more paint on your brush. Continue until all the backs are coated. Try to cover the cabinet good in one coat so you don't have to paint twice on the back.
Follow this technique until all the backs are painted once.
STEP 3: LET DOORS DRY OVERNIGHT...
Let dry overnight and THEN flip to the front. Don't EVER stack the doors because they can stick together and pull off the paint, even when dried keep them apart.
STEP 4: PAINT THE FIRST COAT ON DOOR FRONTS AND DRY OVERNIGHT....
See STEP 2 for technique.
STEP 5: FIX MISTAKES WITH SANDING IN BETWEEN COATS...

Examine the cabinets for any flaws. Sand any imperfections in between coats using a super high grit sandpaper (300+). This can get rid of any drips you accidentally made. We used 400 grit.
STEP 6: RE-INSTALL CABINET DOORS/DRAWERS!
Re-install all the doors/drawers before applying 2nd coat.
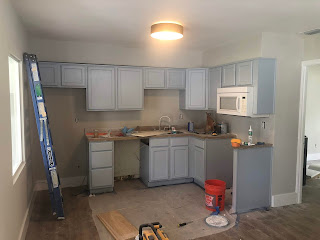
STEP 7: SECOND COAT ON FRONT FACE OF DOORS...
Paint the second coat on the front. Let dry overnight. Install new hardware and you have a brand new kitchen!

At this point the kitchen should have a major facelift! Install some hardware to make the new colors pop!
To see this in video form check out my youtube channel:
See last post for materials list before painting.
STEP 1: PAINT CABINET BASE/UPPER FRAMES...
If you use a mini roller for this it makes it much easier. Use a brush for anything the roller can't reach. Make sure to clean up any drips that happen, easier when the paint is wet!
STEP 2: PAINT THE CABINET DOOR BACKS
Flip all the cabinets so the back of the cabinet door is facing up. Load the brush up and get rid of the excess paint. You should still have a lot of paint on your brush and swipe it on in a uniform fashion to spread on the cabinet. When your brush starts to stick or pull off paint you don't have enough paint on your brush. It should be easy to move your brush over the cabinet, if it's not get more paint on your brush. Continue until all the backs are coated. Try to cover the cabinet good in one coat so you don't have to paint twice on the back.
Follow this technique until all the backs are painted once.
STEP 3: LET DOORS DRY OVERNIGHT...
Let dry overnight and THEN flip to the front. Don't EVER stack the doors because they can stick together and pull off the paint, even when dried keep them apart.

STEP 4: PAINT THE FIRST COAT ON DOOR FRONTS AND DRY OVERNIGHT....
See STEP 2 for technique.
STEP 5: FIX MISTAKES WITH SANDING IN BETWEEN COATS...

Examine the cabinets for any flaws. Sand any imperfections in between coats using a super high grit sandpaper (300+). This can get rid of any drips you accidentally made. We used 400 grit.
STEP 6: RE-INSTALL CABINET DOORS/DRAWERS!
Re-install all the doors/drawers before applying 2nd coat.

STEP 7: SECOND COAT ON FRONT FACE OF DOORS...
Paint the second coat on the front. Let dry overnight. Install new hardware and you have a brand new kitchen!

At this point the kitchen should have a major facelift! Install some hardware to make the new colors pop!
To see this in video form check out my youtube channel:


Comments
Post a Comment